I also found that by taking individual shots of the elements making up any particular decor I could gradually built my own photo library of Bunches, Arches, Table Decor, Ceiling Scatter and other numerous pieces of Classic Décor.
Towards the end of last Century I discovered CorelDRAW and it’s integrated package partner PhotoPAINT. Their similar user-friendly interface made it convenient to intuitively become acquainted with the two programs while working on either. Suddenly the world of computer graphics, photo enhancement, desktop publishing and digital presentation were all part of my now very flexible marketing plan. The presentation of our work was taken to a new level when we were able to make one photo become two or seamlessly blend two into one, add effects, include or portions from another photos. With little effort and a lot of curiosity I was soon amazed at how quickly I was able to teach myself the several simple steps it takes to create impressive presentations. Within minutes I could transform an empty venue into a magical room full of bunches, sculptures, arches and table décor, I was able to present our best selling items from previous functions in different venues, I was even able to used the same bunch and re-colour the balloons … all this without inflating any additional balloons … The preparation time and cost of my marketing campaigns were now dramatically reduced. Overnight I found a new versatility in my promotions. And it was all done by untrained me and not some high priced graphic artist who did not understand the balloon industry. With a little effort you can do it as well … If not better.
GETTING TO KNOW THE INTERFACE
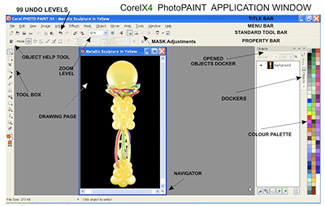
Application Window:
- Work Area:
Simular to CorelDRAW the Application Window has many ‘ready to use’ tools. As with most programs it contains a Title, Menu, Standard and Property Tool Bars. - Dockers: Window (on the Menu Bar) > Dockers
The Dockers are display windows that are positioned on the right hand side of the screen and contain various information related to the using and selection of particular Tools. ‘Frequently used Dockers’ can be displayed as quick activation Tabs in the Docker area as it the Hints and
Objects Docker shown. - Objects Docker: Ctrl+F7n
Window (on the Menu Bar) > Dockers > Objects
An extremely useful Docker, displaying each separate object within a (layered) Image Window in it’s Layered order. Each object can be selected and moved forward or backwards via the Objects Docker. (Ctrl/ Shift PgUp/PgDn). By clicking the ‘eye’ associated with each layer, that particular layer can be made temporally invisible. This feature allows you to work on one particular layered object in the picture without being distracted by the others.NB: After finishing the picture you can save it as Ctrl+S or Export Ctrl+E as a variety of files Eg: Jpeg, BMP or a EPS file. Being able to make your own Clipart made up from portions of shots from your own work allows you to then create an artists impression of a fully decorated room. A distinct advantage when pitching an idea to a client.
Help:
- Hints Docker:
As when using DRAW you should become acquainted with is the Hints Docker. The Hints Docker is a ‘selection activated’ guide for using the program. As you select each Tool a brief ‘how to use’ information is displayed in the Docker area. - Object HELP Tool:
On the extreme left end of Property Bar is an additional set of help tips for the majority of Tools connected to the F1 > Help - Other HELP: F1
Help (on the Menu Bar) > [make your selection]
Additional Help is available through the program Tutorials and Hint from Experts as well as links to the Corel web site www.corel.com The X4 has a two hour tutorial compiled by Australian lad Scott Georgeson who also sells a variety of tutorial DVDs from his website at www.clicknlearn.com.au. My personal favourite location is the Yahoo Chat Group CDU ‘Corel DOWNunder’ http://www.coreldownunder.org.au/. An Australian Corel Users Group. If your search the Corel site you can find links to much more help.If you don’t have the patience to continually learn by your mistakes but to have the good sense to read the Help information provided then you will find working productively between the two programs will be a smooth logical process.
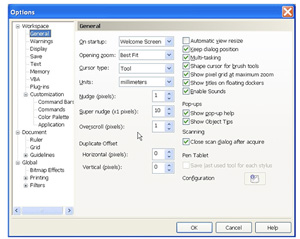
Setting The Defult:
- OPTIONS: Hotkey Ctrl-J
Tools (on the Menu Bar) > Options
Options window is used for adjusting the default settings.
[I recommend that before you begin adjusting any of the Factory Default Settings that you create you own Workspace.]Tools (on the Menu Bar) > Options > Workspace.
Once in the Workspace section you can select the ‘new button’ to enable you to create your own personal Workspace Within the Options Window you can now freely set the page size, measurements and save settings.
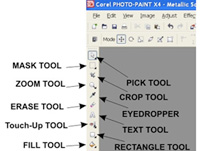
Tools and How to Use Them:
- The Toolbox:
Situated on the left side of the screen the Toolbox allows of quick access to a variety of Tools. The Toolbox is as the name implies the area where you open the most common Tools such as Text – Fill and Zoom. Many of the Tools are FlyoutsFound along the Toolbox the Tools with the small triangle in the bottom right corner allow it to ‘flyout’ as shown by the examples shown in the Diagram. The Flyout Tools can be positioned anywhere within the Application Window ready for easy access. Fly-outs display similar Tools Eg: the Mask Tool and it’s various versions
- Mask Tool Flyout:
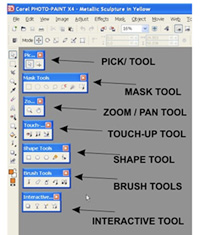 A much used Tool on my program. I use one or another version of the Mask Tool just about every time I work on a photo. Particularly when I want to delete the unwanted Back Ground or add an effect to a particular area. Eg: deleting, brightening, colour changing and copying. A border of ‘marching ants’ around the selection defines the Masked area. Eg: Rectangle Mask, Ellipse Mask, Lasso Mask and the Brush Mask. Once an area is captured with the Mask Tools you can fine-tune your selection.. When using the Mask Tool the Property Bar changes it’s display allowing you to add or subtract, add transparency or feathering around the edge.
- Magic Wand Mask:
Open the Mask Flyout (in the Toolbox) > click the Magic Wand Mask Tool
Select a tolerance value in the Tolerance Box > select the area you want to edit. The colour of the first pixel that you click establishes the seed colour and all adjacent pixels with colours within the specified colour tolerance range are captured within the Mask. You can apply a number of effects to the selected area. Eg: Practical use is shown later in this article - Touch-Up Tool Flyout:
This Tool comprises of the Red Eye Reduction Tool the Touch-Up Tool and the very useful Clone Tool. - Clone Tool:
Open the Touch-Up Flyout > click the Clone Tool
Click the right mouse button on the are you want to clone (the Clone Mask will now have a + (plus sign) in centre) Move the curser to the area you want to put the clone and click the left button. The clone area follows the movement of your mouse. Extremely useful for repairing damaged scanned pictures - Interactive Flyout:
Open the Interactive Flyout (in the Toolbox) > Click the Drop-Shadow Tool
Drop-Shadow Tool allows for a shadow to be placed behind an object with a high degree of variation.
make customised Clipart and inserting it into a new photo.
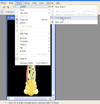 |
FIGURE ONE:
To enable you to have no background around the required piece of decor you must first select Object > Create > New Object From Background |
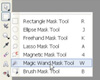 |
FIGURE TWO:
The first TOOL you select is the Magic Wand Mask Flyout Tool (in the Tool Box) > Magic Wand |
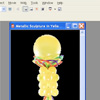 |
FIGURE THREE:
With the Magic Wand Tool select the area (black in the example) that you want to delete > Delete |
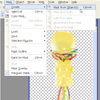 |
FIGURE FOUR: Ctrl M
Once the unwanted area is deleted select Mask (on the Menu Bar) > Create > Mask From Object(s) |
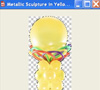 |
FIGURE FIVE:
Select (on the Menu Bar) Image > Crop > Crop To Mask |
Now that you have the desired Sculpture/Bunch (or other object) with no background it can be saved as a Corel PhotoPaint file (CPT) under what ever name you require and used as an original piece of Clipart. File > Save As Type > CPT-Corel PHOTO-PAINT Image
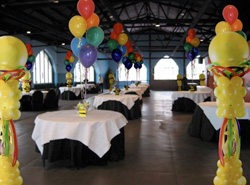 FIGURE SIX:
 In Corel PhotoPAINT I opened a photo of an empty venue. Select (on the Menu Bar) File > Open > The desired File
FIGURE SEVEN: Ctrl I
Select (on the Menu Bar) File > Import > The desired File
I then placed the Sculpture in the position I required on the photo
FIGURE EIGHT: Ctrl C > Ctrl V
I selected the original image and copied and pasted it seven times. I reduced several of the Sculptures and placed them around the photo to represent the Sculpture actually being in the room.
FIGURE NINE: Ctrl I
Select (on the Menu Bar) File > Import > The desired File
As in Figure Seven I imported a file, this time my Clipart Bunch. I then reduced the size of the Bunch and positioned it on a table.
FIGURE NINE: (B) Ctrl C > Ctrl V
I copied and pasted the bunch eight more times and reduced/placed them around the room on the tables to finish the décor.
No comments yet.