General Use:
- I use Draw to make my clipart and layout presentations. After importing a photo of an empty venue it is
so easy to actually draw bunches, garlands and arches anywhere on the picture. - Once the scene has been created the new picture can be saved as a Jpeg file (or any number of other file
types) and forwarded to a client along with the quote. - The flexibility of being able to create different décor within an existing photograph without inflating a
balloon is not only convenient but it allows you to create a ‘presentation image’. - If your unsure about how to layout a promotional page you can make use of Corel’s Templates. Select
File (on the Menu Bar)> New From Template.
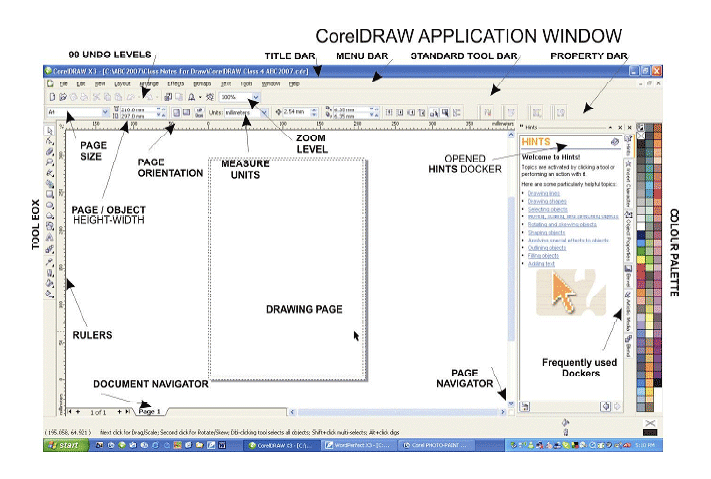
Application Window Draw:
- It is here you work within the page area to draw graphics, write text, import/export clipart and photos, adjust colours and save pages in a variety of Files. Eg: PDf, HTML, Jpegs and files associated with other software such as HPGL Plotter File or AI for Adobe Illustrator.
- The ability to receive and send files in variety of formats is a huge advantage when receiving client artwork for a printed balloon order and sending quotes to corporate clients.
- You will find the usual standard Dropdown Menu’s on the Tool Bars at the top of the screen to be simular to most word processors or desk top publishers.
- At the bottom left of the window is the Document Navigator tab allowing you to add/select pages.
- On the bottom right side is the Page Navigator allowing you to scroll to new areas of the page while in ‘close-up zoom mode’.
- Page size can be adjusted through the dropdown window on the Property Bar or in Options.
- Although there are a large number of Hotkeys I predominantly utilise the mouse to activate most Tools.
Dockers:
- Dockers are display windows on the right hand side of the screen and contain various levels of information related to the using and selection of particular Tools.
- Frequently used Dockers can be displayed as quick activation Tabs in the Docker area eg: The Hints Docker or the Artistic Media Docker
Hints Docker:
Window (on the Menu Bar) > Dockers > Hints
- This Docker should be the first feature you become acquainted with, it is a helpful ‘selection activated’ guide for using different tools. As you select each Tool the ‘how to use’ information is displayed in the Docker Window. It is the Help (F1) continually open.
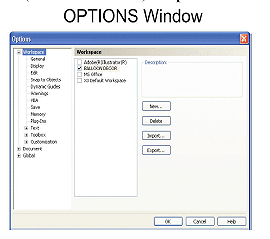
- Within the Options window you will find a large selection of Default Settings which can be adjusted to suit your
personal needs. [I recommend that before you begin adjusting any of the Factory Default Settings that you
create you own Workspace. thus leaving the X3 Default Workspace in it’s original setup] - Tools (on the Menu Bar) > Options > Workspace.
- Once in the Workspace section you can choose from the provided clones or select the ‘new button’ to enable you to create your own personal Workspace as you can see in the Diagram, I have done this for BALLOON DECOR.
Help: (Hotkey F1)
Help (on the Menu Bar) > [make your selection]
- If you don’t have the patience to continually learn by your mistakes but to have the good sense to read the printed Help information provided then you will find working productively between the two programs will be a smooth logical process.
- Additional Help is available through the program loaded tutorials and links to the Corel Help Web Site http://www.corel.com/
- The box set also comes with additional written material from experienced professionals
- If you want to join an online chat-group I suggest you try the Yahoo Group CDU (Corel DOWNunder) or visit their web site www.coreldownunder.org.au. It is based in Australia with members from many parts of the world. I have been a member of the local meeting group for many years and owe a large percent of my understanding of what the program can do to the advice provided by the group.
- Another way to learn how to use the program is to invest in interactive teaching software. Another online learning site is Click’n’Learn, also in Australia, so if you like the Aussie accent then Scott Georgeson has the site for you. It provides a comprehensive collection of learning CDs for the raw beginner and advanced user. I have collected and learnt from all their CDs for years. They have recently released a set of short interactive classes which are both clearly presented and easy to follow as you work through the projects. Covering Corel 11, 12, X3 you can also download a free trial versions of some lessons which are good value by itself at www.clicknlearn.com.au. The whole site is worth a good browsing, loaded with valuable information and tips
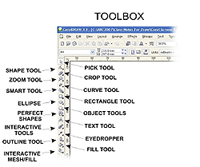
The Toolbox:
- Situated on the left side of the screen the Toolbox allows of quick access to a variety of Tools.
- The Toolbox is as the name implies the area where you open the most common Tools such as-Text – Fill and Zoom. By selecting the Tools with the small triangle in the bottom right corner of the Tool allows it to Flyout as shown by the examples shown in the Diagram. Tools can be positioned anywhere on the screen. The Tools that allow Flyouts display either similar Tools or variations of the one Tool.
- As each Tool is selected user information is displayed in the Hints Docker.
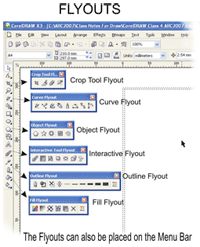
Flyouts:
- Found along the Toolbox Flyouts are additional Tools and settings.
- Flyouts are noted by the small triangle in the bottom right corner of button indicating that the set of Tools and settings can be positioned anywhere within the Application Window ready for easy access.
- You can place regularly used Tool Flyouts in the Application Window or on the Property Bar.
Text:
- The Text Tool is activated from the Toolbar by selecting the ‘A’.
- Fonts/size/colour can be chosen from the drop-down windows on the Property Bar and Colour Palette.
- Select Text then Left or Right Click in the Colour Palette will fill and outline colours respectively
- Outline thickness is adjusted by Outline Tool>(make your selection)
- Draw also comes with a Bitstream Font Navigator which helps you organise any number of Fonts.
Types of Text:
- Paragraph Text is activated by selecting the Text Tool and then by placing the curser anywhere on the page and Left Click ’n’ Drag to make a box. This box becomes the parameters for your paragraph text sometimes know as a ‘text box’
- To change Font or Text Size: select the text and use the Dropdown Menu on the Property Bar.
- Artistic Text Select the Text Tool and then Left Click anywhere on the page. A blinking marker appears allowing you to begin typing. Once you have typed the first letter a set of Nodes (8 black dots that surround a Selected object) appear allowing you Click ’n’ Drag to expand and reduce the size of the text to visually fit any area. You are required to use the Return Button to create a new line.
- To change Font or Text Size: select the text and use the Dropdown Menu on the Property Bar.
Simple Text Task in CorelDRAW®:
Breaking Text Apart:
- Type a word in Artistic Text on the page.
- Select the Text.
- Select Arrange (on the Menu Bar) > Break Artistic Text.
- This will break the text into individual letters allow you move/flip/rotate each letter individually as shown in the graphic.

Fitting Text To Path:
- Artistic Text also allows you to place the text along any path as shown in the graphic.
- Type a sentence in Artistic Text on the page
- Use Ellipse Tool to create a circle on the page. (by holding the Ctrl Button down while making circles or squares will ensure they have even dimensions)
- Select Text (on the Menu Bar) > Fit Text To Path. A black arrow appears in place of your normal curser allowing you to Click the arrow along the circumference of the circle and position the text along the line. As you can see in the two examples below the text can now be placed anywhere along any line.

Creating a Balloon in CorelDRAW®:
It is a quick task to create a round balloon.
- Select the Ellipse Tool in the Toolbox.
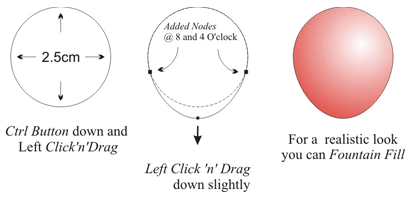
- Hold the Ctrl Button down and Left Click’n’Drag anywhere on the page and you will now be able to create a perfect circle approx 2.5 cm or 1 inch in diameter. I usually work with my On-Screen balloons being one tenth the size of the real size balloon. This would make the realballoon 25cm or 10 inches in diameter, this is not the best for long time float value but because I work in metric it is easier to keep my sizing ratios organised.
- The dimensions can also be manually set by adjusting the Object Height-Width on the Property Bar.
- We all know that balloons are not perfect spheres so some adjustments need to be made. Select the circle with the Pick Tool and then on the Property Bar select the Convert to Curves (Hotkey Ctrl-Q)
- Select the Shape Tool in the Toolbox. This tool will allow you to add two extra Nodes by double clicking the Circle at 8 and 4 O’clock on the circumference.
- Left Click ’n’ Drag at 6 O’clock down slightly and you will notice the shape is now becoming slightly egg shape.
- From here you can adjust to make the balloon shape of your choice.
Adding the Colour:
- You can simply Left Click in the Colour Palette block fill your balloon with any colour. If you’d prefer to give the balloon a more realistic look you can Fountain Fill (shade) the balloon.
- Fill Tool>Fountain Fill Dialog (F11) Within the window select Type>Radial and Colour Blend> Two Colour then Choose a colour From and To. In the top right you will see a shade adjustment window that will allow you to move the position of the light reflection on the balloon.
- You may need to Right Click within the Colour Palette to give the balloon a lighter colour outline.
 |
 |
Creating the Ribbon:
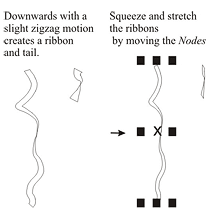
- On the Toolbar select the Flyout Curve Tool>Artistic Media Tool: (Hotkey (i), the Property Bar will change to include some new settings.
- From the dropdown window Preset Stroke List choose the brush style about half way down the list that looks like a ribbon with two flat ends. Set the Artistic Media Tool Width to 2.26 and the Freehand Smoothing at 50.
- Anywhere on the page Left Click ’n’ Drag the mouse downwards with a slight zigzag motion.
- By shortening the Click ’n’ Drag and changing the motion and/or the Preset Stroke you can create all types of ribbons and tails. Squeeze and stretch the ribbons by moving the Nodes.
- To colour, Click either the left or right buttons with the Colour Palette or use the Fountain Fill described in the ‘Adding the Colour’ section.
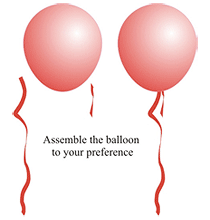
- Assemble the balloon to your preference

Making a NON-Round Balloon:
- Making anything from a 160 to 646 or anything beyond is easy on the lungs if you follow the same procedure as described in the ‘Creating the Ribbon’ section except in the Preset Stroke List choose the brush style that is about a ¼ the way down the list with the rounded ends.
- By selecting with the Pick Tool and sliding the Nodes a variety of sizes and shapes can be realised.
Hotkey Hot-Tip:
- Sometimes when you have a large file photo or graphic you machine can be a bit slow in the Copy/Paste mode. For a speedier action select the object and then press Ctrl-D and instantly you have a copy. If move the 1st copy to a new position then repeat the Ctrl-D and the new copies will be position with the same spacing as the 1st and 2nd copies.
No comments yet.