 Leaning Tower Topiary
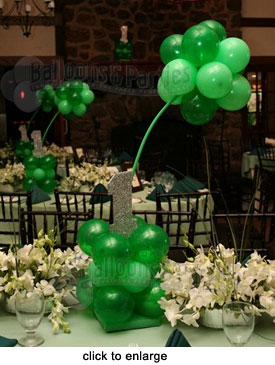
Here is a real simple, yet elegant centerpiece that can be customized in a variety of ways for your clients. It’s a fun piece that will delight children and can be something more elegant as well, depending on your color scheme and/or artwork add-ons. Our example was created for a first birthday party that highlighted the occasion with a custom cut piece of ½” foamboard (#1) that was glittered in silver. Most tables were for adults and the look was enhanced by flowers to the sides of the topiary design. The shades of green for the entire event (linens, napkins, décor) gave the party a fun, fresh, garden party feel while still being inside with a lot of tables very close together in a tightly packed ballroom.
Ingredients:
24 – 5” latex balloons
1 – 6” square piece of ½” wood, MDF or plywood for base
1 – black metal floor flange (available at hardware store)
1 – screw-in coupling for floor flange
1 – piece 6” of ½” conduit (EMT) or ½” PVC
1 – piece 3’ ¼” or ½” aluminum rod
1 – piece of foamboard art (your choice) per your theme
1 – balloon stick or ¼” wooden dowel rod
Assembly:
1. Assemble floor flange to 6” square base.
2. Screw in coupling and attach piece of 6” – ½” conduit (EMT) or ½” PVC to coupling
3. Paint base, flange and conduit or PVC your desired color.
4. Create a 12 balloon topiary/puff ball for the top (balloons sized to 4”)
5. Bend 3’ ¼” or ½” aluminum rod into a slight half-round shape.
6. Color rod to your theme by covering with tape, stretched 260 or 360 balloon or paint.
7. Cover base with three layers of 4 clusters of 5” latex balloons. Bottom row of balloons sized to 4”, middle row sized to 3”, top row sized to 4”
8. Wrap topiary onto top of curved rod.
9. Place artwork onto thin stick or balloon stick and place into conduit/PVC rod in base
No comments yet.